


This article assumes you already know how to write some tests in JavaScript (we’ll use mocha), how to run them in a browser (with karma) and have an idea of what Test-Driven Development is. If you’re not, don’t panic an go read this gentle introduction to JavaScript TDD.
If you were the perfect developer you would always modularizes your components, code in TDD and write documentation in PRs.
But confess, this is not really happening right ? Sometimes you might skip doc because you’ve tested so well, you feel that it’s enough to document what the code does. Or you are just giving yourself a free pass from testing a component which is mainly CSS styles.
In the end you’d rather chose the comfort of the browser feedback than the very un-visual ............. (12 PASSED).
TDD in the console can seem irrelevant for visual stuff, because writing a lot of tests and a lot of examples of the code usage is simply boring.
When I encountered this problem, I tried to make my dev experience more fun by:
- allowing my component’s tests to give me visual feedback in the browser
- embedding these test cases in my documentation
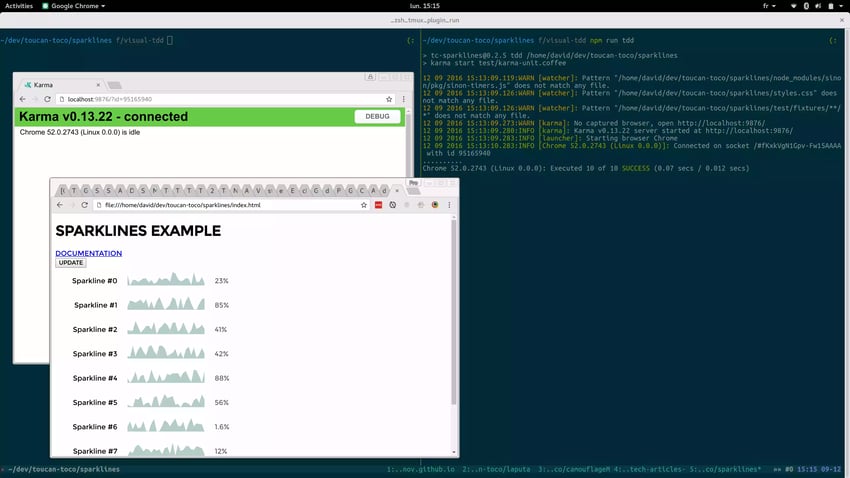
I’ll show you the steps I used in a small open-source project I did, a d3 plugin for drawing sparklines.
Visual output of tests
In this little project of mine, I started writing some tests. However, I didn’t feel satisfied by having at the same time:
- tests running in my console (or in my browser but hidden) and hard to debug
- a “test application” to see how my component looked and behaved in-vivo.
To avoid doing the work twice, I wanted my test engine to give me a visual feedback so I didn’t have to look at another console window. It also prevented me from having to write a page example for each test case I wanted to have.
Here is a simple webpage to run my tests, called tests.html:
  <head>
    <link href="https://cdnjs.cloudflare.com/ajax/libs/mocha/2.5.3/mocha.css" rel="stylesheet" />
  </head>

  <body>
    <div id="mocha"></div>

    <!-- Set up the tests -->
    <script src="https://cdnjs.cloudflare.com/ajax/libs/chai/3.5.0/chai.js" type="text/javascript"></script>
    <script src="https://cdnjs.cloudflare.com/ajax/libs/mocha/2.5.3/mocha.js"></script>

    <script>
      mocha.setup('bdd');
      chai.should();
    </script>

    <!-- My module dependencies -->
    <script src="https://cdnjs.cloudflare.com/ajax/libs/d3/3.5.16/d3.js"></script>
    <script src="https://cdnjs.cloudflare.com/ajax/libs/lodash.js/3.10.1/lodash.min.js"></script>
    <!-- My module to be tested -->
    <script src="dist/tc-sparklines.js"></script>

    <!-- My test suite -->
    <script src="dist/test/unit/tc-sparklines.spec.js"></script>

    <!-- Run baby! -->
    <script>
      mocha.checkLeaks();
      mocha.run();
    </script>
  </body>
We now have a nice output of the results in a browser, but we can’t see the produced DOM element for each tests.
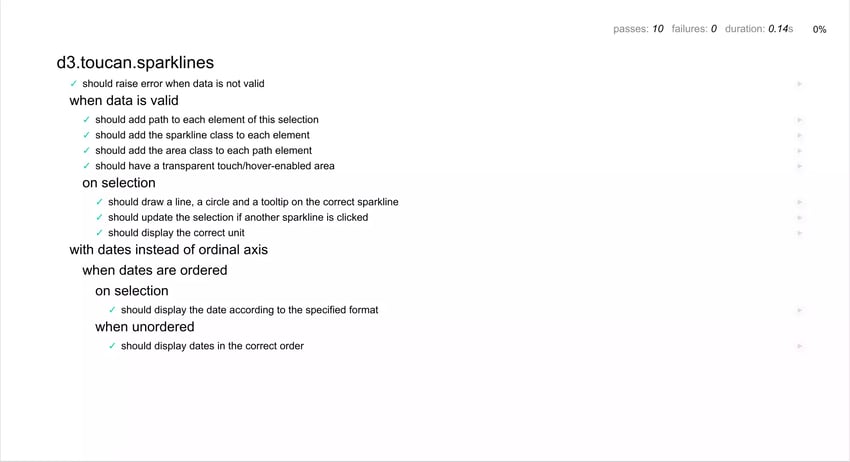
Let’s add a small piece of code that will create an element for each test case for us to work on: add-dom-element.js:
// Create an element for us to work with
beforeEach(function() {
  this.id = _.uniqueId('test-');
  this.DOMElement = d3.select(document.body)
    .append('div')
    .classed('test-dom-container', true)
    .classed("" + this.id, true)
    .node();

  // I'm using d3 here, but it's definitely optional
  // Manipulating the DOM directly, or use jQuery, or whatever else
});

// Append it next to the correct test report
// (We need to wait for the reporter to have created it's HTML elements ;))
afterEach(function() {
  var testsReportsElements = document.getElementsByClassName('test');
  var testReport = testsReportsElements[testsReportsElements.length - 1];

  if (!testReport) {return;}
  return testReport.appendChild(this.DOMElement);
});
Now, we can import this before our test suite and we’ll have access to this.DOMElement in each test.
This will ensure that for each tests, we’ll work on different elements. So our tests are isolated from one another.
In our HTML, we have to import this new file:
<script src="dist/test/unit/add-dom-element.js"></script>
<!-- My test suite -->
<script src="dist/test/unit/tc-sparklines.spec.js"></script>
And then, e.g., in a test where a MyElement function will manipulate the DOM, we could use it like:
it('should instanciate my element', function() {
  MyElement(this.DOMElement);
  // And then I can assert that this.DOMElement has been modified, or that
  // children have been created, ...
});
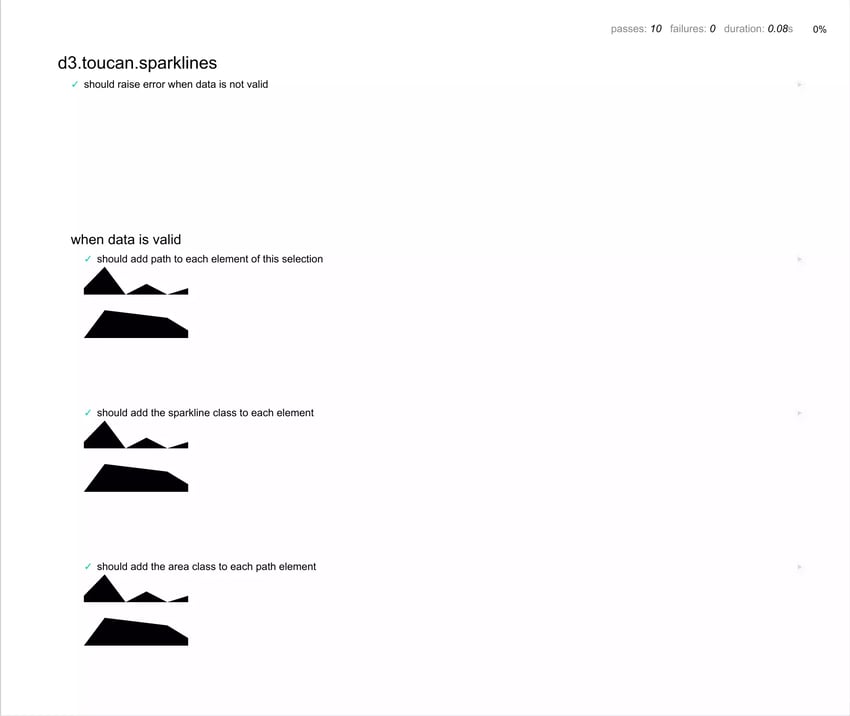
Refinements
Report styling
It’s then possible to visually improve our tests results by adding a small box around our test elements. I suggest:
#mocha .test-dom-container {
  display: block;
  float: right;
  clear: left;
  margin: 5px;
  padding: 15px;
  border: 1px solid #eee;
  max-width: 85%; /*(1)*/
  max-width: calc(100% - 42px); /*(2)*/
  border-bottom-color: #ddd;
  -webkit-border-radius: 3px;
  -webkit-box-shadow: 0 1px 3px #eee;
  -moz-border-radius: 3px;
  -moz-box-shadow: 0 1px 3px #eee;
  border-radius: 3px;
}
Component styling
Right now, we can see the output of our DOM manipulation, but in order to have a better view of what our component will really look like, we can of course add its stylesheet to our test page tests.html:
<head>
  ...
  <link href="dist/tc-sparklines.css" rel="stylesheet">
</head>
Karma integration
When starting karma, an empty window displaying pretty much nothing appears. Visual output for the tests is supposed to be found in the “DEBUG” tab.
We can display our visual tests reports in that tab by adding some option to karma config:
  client: {
    mocha: {
      reporter: 'html'
    }
  }
Karma can also serve some CSS. Just add the in the
filesconfig section.
Multiple components testing
To avoid creating many html files that are basically the same but import different test suites, we can make use of the awesome url grepping of the html reporter, and only keep one html file to run all our tests.
Example: https://cdn.rawgit.com/ToucanToco/sparklines/master/tests.html?grep=d3%5C.toucan%5C.sparklines%20when%20data%20is%20valid%20on%20selection will display only tests about sparklines’ tooltip.
Bundling
This operation becomes much simpler when using a module bundler, like webpack. We only need to require all our dependencies in the test, and we will have a bundle that’ll become the only included <script> in our html.
In webpack, add your test file as an entry point and you’ll have a bundle for your tests!
When testing multiple components, it’s therefore possible to have one bundle per component, to avoid grepping for a very large test suite that will contain everything.
It’s also convenient to be able to require our add-dom-elementutility where we want. The tests that don’t need this (such as functional logic tests) could avoid having useless elements created for them.
describe('My component', function() {

  describe('utility functions', function() {
    // Without elements created
  });

  describe('DOM manipulation', function() {
    require('add-dom-element');

    // Now I can work on this.DOMElement
  });
});
Documentation integration
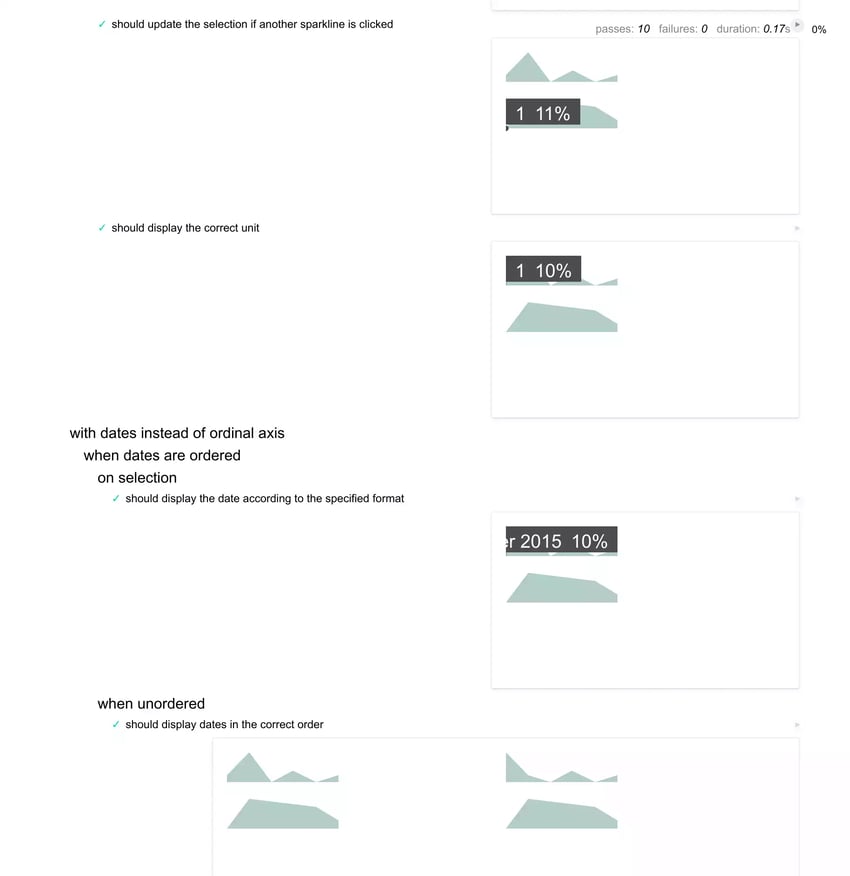
Now that our tests look good, let’s integrate that in our documentation! The perks are quite obvious: no need to write twice the examples cases… therefore the two are always in sync.
For my small sparklines project, I didn’t use any tool to build the small website, I just linked the test pages we generated (see ‘explore the test suite’ section). However, for bigger projects like the apps we develop at Toucan Toco, it may be interesting to look at JSdoc.
Once JSdoc is ready, you’ll have a nice output like: 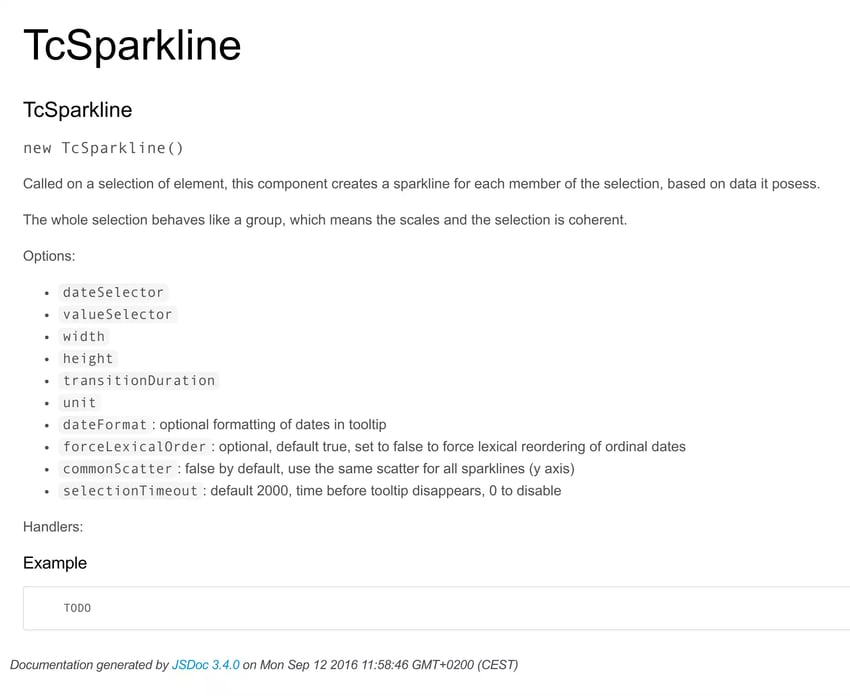
So I’d really like to be able to include my tests there.
Here is my wanted docstring:
/** @constructor @description Called on a selection of element, this component creates a
sparkline for each member of the selection, based on data it posess. [...] @tests
Sparklines */
TcSparkline = [...]
Note that I create a custom tag @tests to enhance the set of tags JSdoc provides.
In a jsdoc-plugins/tests.js, we define the new tag and add the tests attribute to the doclet (the documentation unit):
// Adds the @tests annotation
exports.handlers = {
  newDoclet: function(e) {
    var tags = e.doclet.tags,
      tag,
      value;

    // any user-defined tags in this doclet?
    if (typeof tags !== 'undefined') {
      // only interested in the @tests tags
      tags = tags.filter(function($) {
        return $.title === 'tests';
      });

      if (tags.length) {
        // take the first one
        tag = tags[0];

        try {
          value = tag.value;
          if (!value) { throw Error }
        }
        catch (e) {
          logger.error('@test tag expects a string for mocha to grep');
          return;
        }

        e.doclet.tests = value;
      }
    }
  }
};
We then need to tell jsdoc to use our plugin. In jsdoc.json:
{ ..., "tags": { "allowUnknownTags": true, ... }, , "plugins": [ ... "jsdoc-plugins/tests" ], ... } Now that jsdoc knows the text we’ve put in the @tests: let’s use it!
I’m gonna enhance the default doc template to add a tests section by overriding the default template, let’s say in a jsdoc-lapyout.tmpl file:
[...]
<div id="main">

    <h1 class="page-title"><?js= title ?></h1>

    <?js= content ?>

    <?js var testsGrepped = []; docs.forEach(function(doc, i) { if (doc.tests) { testsGrepped.push(doc.tests); // Here, I read the @tests value... } }); if (testsGrepped.length) { ?>
      <section>
        <h3 class="subsection-title">Associated tests</h3>

        <link href="main.css" rel="stylesheet" />
        <link href="https://cdnjs.cloudflare.com/ajax/libs/mocha/2.5.3/mocha.css" rel="stylesheet" />
        <link href="jsdoc-tests-styles.css" rel="stylesheet" />

        <div id="mocha"></div>

        <script src="https://cdnjs.cloudflare.com/ajax/libs/chai/3.5.0/chai.js"></script>
        <script src="https://cdnjs.cloudflare.com/ajax/libs/mocha/2.5.3/mocha.js"></script>

        <script>
          mocha.setup('bdd');
          chai.should();
        </script>

        <script src="scripts.js"></script>

        <script>
          mocha
            .checkLeaks()
            .grep("<?js= testsGrepped.join('|') ?>") // and here I give to mocha
            .run();
        </script>
      </section>
    <?js } ?>
</div>
[...]
To use the new template, I must add in jsdoc.json:
{ [...], "templates": { [...], "default": { "staticFiles": { "include": [ "www/styles/main.css", <- my components CSS "test/compiled/scripts.js", <- my tests bundle "jsdoc-tests-styles.css", <- my mocha specific CSS [...] ] }, "layoutFile": "jsdoc-layout.tmpl" <- my new template file } }, [...] } And that’s all!
To change from the sparklines, I’ll give you an example of how it could render for another component we developed for Toucan Toco visualizations. 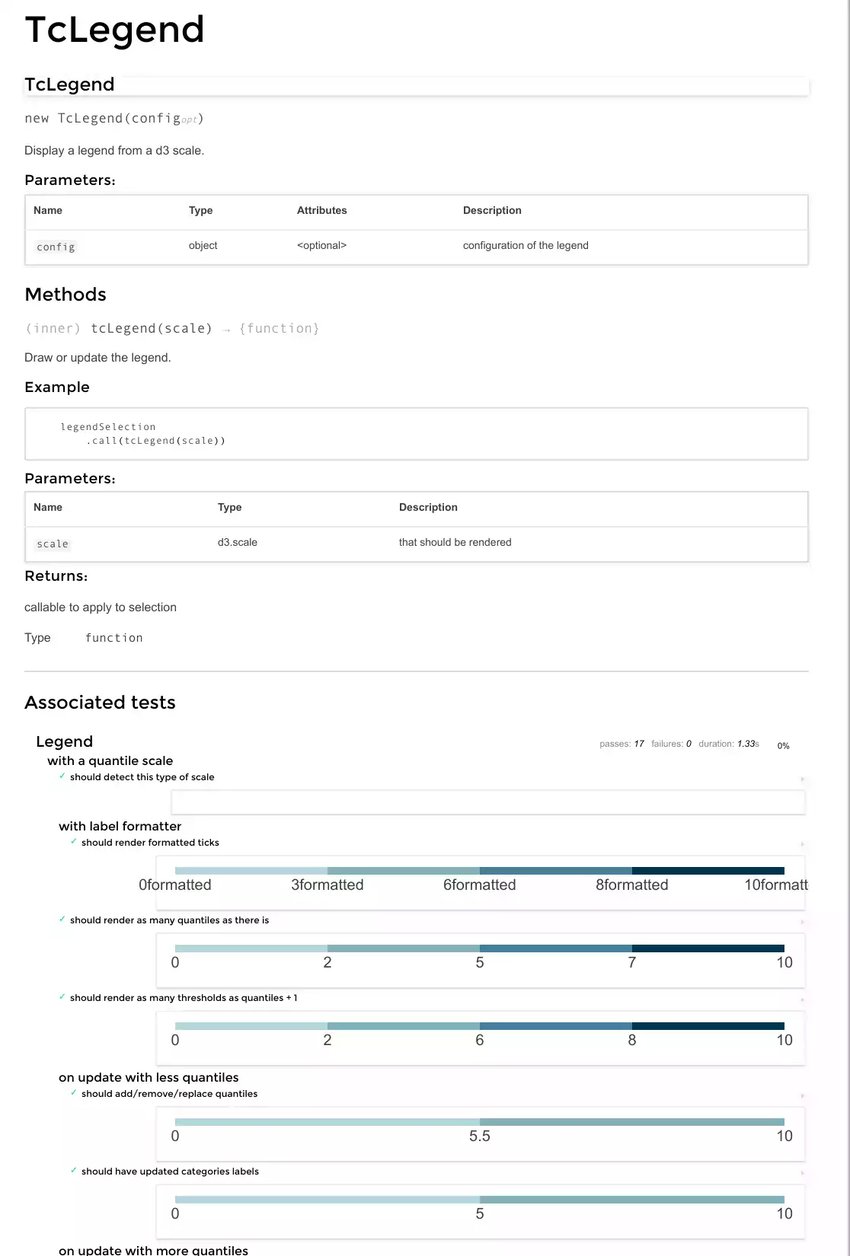
I hope these little tips inspired you to improve your front-end development workflow ;) Happy visual TDD!